Learning to draw a nose – step by step to a realistic nose
Draw a nose is one of the most important basics in portrait drawing: And it’s often much easier than it looks at first glance!

In this article, I’ll show you how to build up a nose step by step: from a simple sketch to clean outlines and proper shading. I’ve also prepared several example guides to help you confidently draw different nose shapes and various perspectives on paper.
You can find information on drawing the complete face here:
Anatomy: Structure of the nose
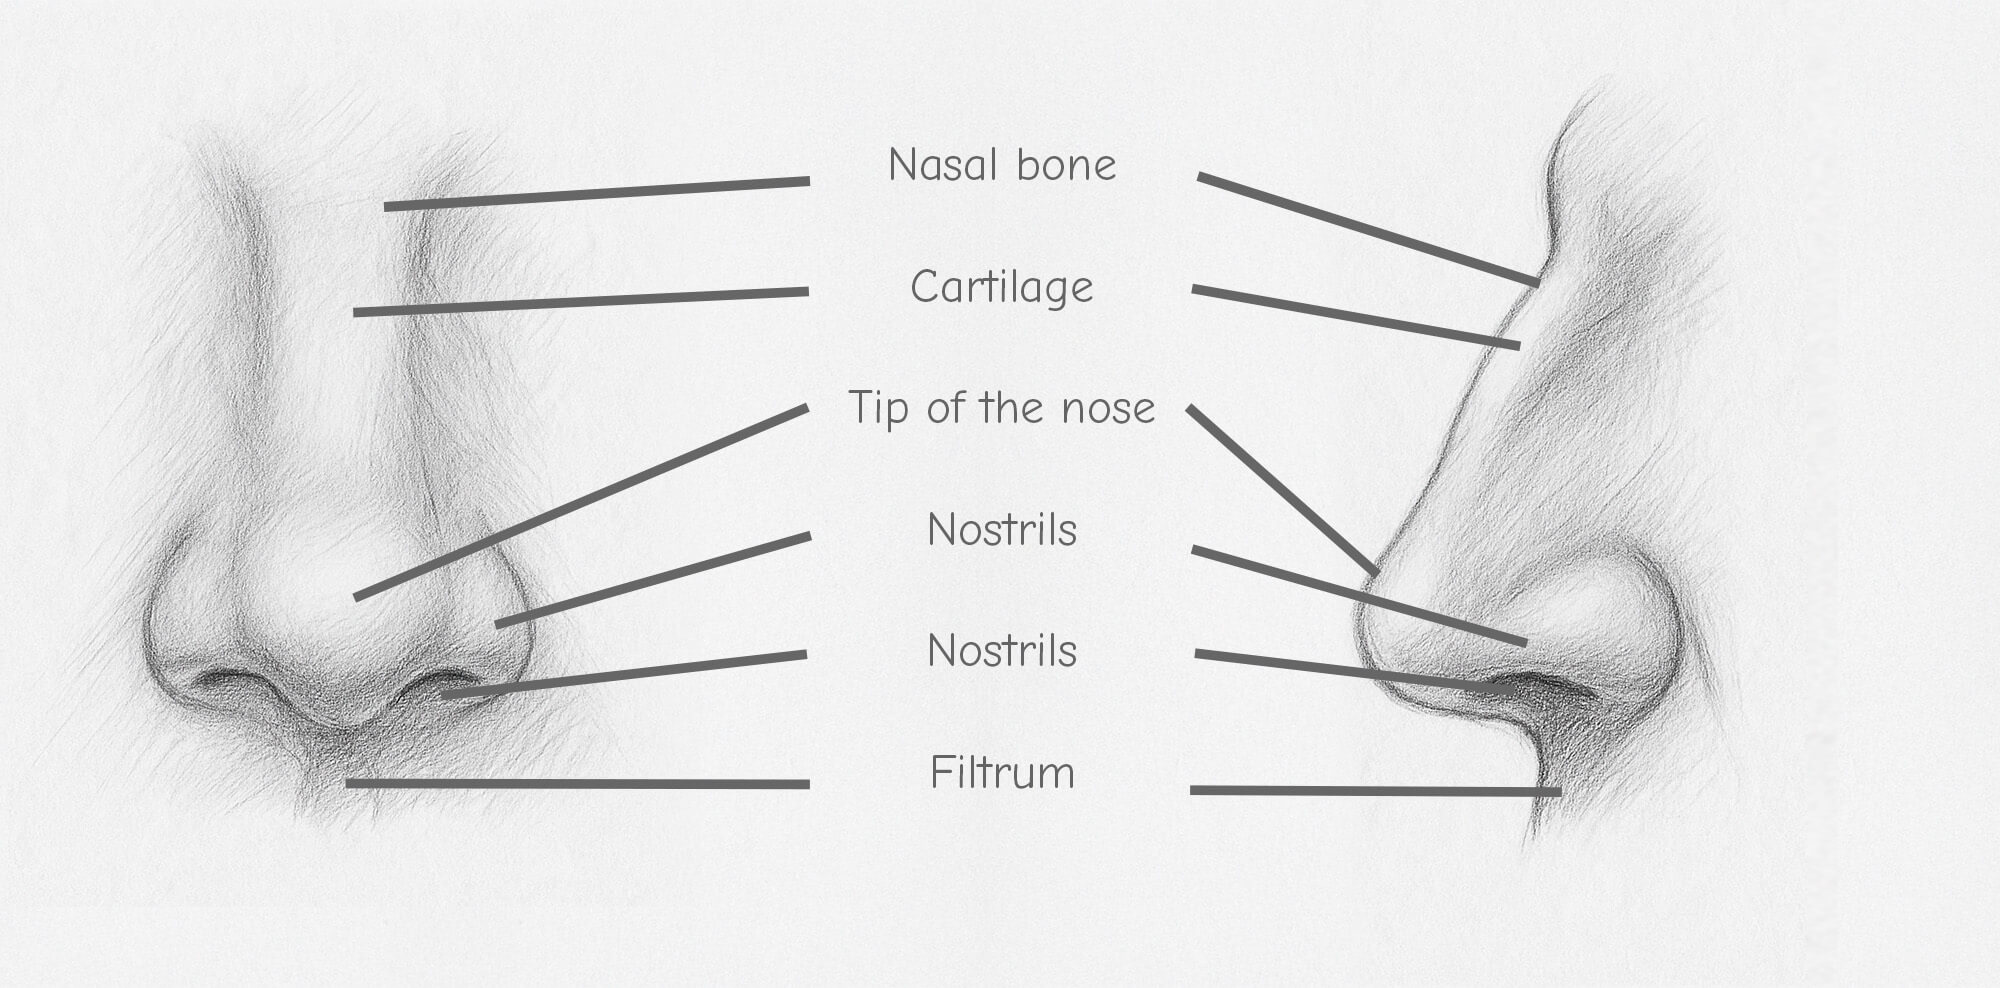
The nose consists of several important areas that you should know when drawing in order to be able to create a nose without a template:
- Nasal bone: The firm upper part of the nose that forms the bridge.
- Cartilage: The softer area below the nasal bone that gives the nose its flexibility.
- Tip of the nose: The rounded part at the bottom end, often a defining feature.
- Nostrils (alae): Enclose the nasal openings from the sides.
- Nasal openings: Openings suggested by shadow — this is where the darkest shading is found.
- Philtrum: A small, narrow groove between the tip of the nose and the upper lip — important for a natural transition.
➡️ Tip: When drawing, make sure to model transitions smoothly and build volume using light and shadow — avoid harsh lines. It’s also recommended to use pencils of varying hardness levels; hard pencils for light, soft lines and shadows, and soft pencils for darker shading.
Learning to draw a nose – here’s how
The nose gives the face character and shape. It consists mainly of soft transitions / shading and less of hard lines. It is therefore particularly important that you work with light strokes when drawing the nose and use the shadows in a targeted manner.
Here you can find several short tutorials that show you how to draw different types of noses:
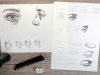
Example 1: Drawing a simple nose from the front
- first draw a vertical center line and lightly sketch an oval shape for the tip of the nose.
- add small arches to the left and right for the nostrils. Carefully indicate the nostrils without using hard outlines.
- in the next step, outline the bridge of the nose and continue outlining the nostrils.
- work with gentle shading below the tip of the nose and along the nostrils. Leave the areas that catch the light lighter.
- finished: From the bridge of the nose, over the tip of the nose, the filtrum forms the gentle transition to the mouth.

➡️ Tip: Start with hard pencils (e.g. H, F or HB) and only strengthen the shadows at the end with softer pencils (B, 2B, 4B).
Example 2: Nose from the side (profile view)
- sketch a slight curve for the bridge of the nose. Draw a small circle underneath for the tip of the nose. Add auxiliary lines for the nostrils and filtrum.
- without auxiliary lines / basic shapes: Add the nostril with a gentle curve at the bottom edge. Make sure that the bridge of the nose and the distance to the upper lip are proportionate.
- start with the shading – modeling the nostrils.
- gently shade along the bridge of the nose and under the nostril.
- use the shading to finish shaping the nose. Darker shadows emphasize the hollows.

➡️ Tip: The shading follows the light source – one side usually remains lighter.
The bridge of the nose can be designed either as a straight line or with slight curves for more character, which is particularly effective in profile.
Example 3: Characterful nose with stronger shadows
- start with the center line and basic shapes as for the basic nose.
- next to the bridge and tip of the nose, indicate the nostrils and filtrum.
- deliberately incorporate more prominent lines and indentations, e.g. for a larger nasal bridge or a wider nasal bridge. Sketch out the nostril.
- use strong contrasts of light and dark to emphasize character and age – such as small wrinkles on the sides. Work out small details such as nostrils, skin texture or shadows below the nose more intensively.

➡️ Tip: This type of nose is ideal for older characters or distinctive faces.
Tutorials: Drawing the nose from the side
Here you will find further image tutorials that clearly show how to draw a human nose from the side in several structured steps – from the basic shape to the finished shading.
In the first tutorial, the drawing process is shown diagonally from the front: Starting with a simple circle and a sweeping central axis, the next step is to add the wings of the nose and the outer contours, before the final stage involves sculptural shading to add volume and depth.

The second tutorial shows the nose in a lateral perspective from the left. Here, too, the construction begins with simple geometric shapes – a circle as the tip of the nose and a curved line as the bridge of the nose – and develops through precise lines to a shaded, realistic representation.
The emphasis on the areas of light and shadow in the final step is particularly helpful, enhancing the three-dimensional effect of the nose.

Both examples illustrate how important the structure of basic shapes is in order to achieve a convincing anatomical drawing.
More Pages
From the German Blog
- Drawing and Painting Colored Pencil Portraits
- Painting Portraits with Colored Pencils
- Drawing an Afro Woman Portrait with Colored Pencils
- Drawing a Girl with a Soda Bottle Using Colored Pencils
- Drawing a Girl Resting Her Head on Her Hand with Colored Pencils
- Blending and Shading with Pencil
- Drawing Technique: Learning to Draw with a Grid