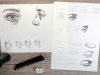
Drawing ears of people
Although the ear is a rather small detail in the face, it plays an important role in the overall expression of a portrait. Many people shy away from drawing ears because they seem complicated at first glance – but they mainly consist of a few curved shapes that can be easily simplified.
In this article, I’ll show you how to draw a realistic human ear step by step – with tips for beginners and advanced artists.
Information on drawing a complete face can be found here:
Anatomy – the basic shape of the ear
Before you start drawing, it helps to break down the ear into its most important components:
- Helix: Before you start drawing, it helps to break down the ear into its most important components:
- Antihelix: An inner bulge that is usually bifurcated.
- Concha: The large central depression that leads to the ear canal.
- Tragus and antitragus: Small cartilage parts at the front of the entrance to the ear canal.
- Ohrläppchen (Lobulus): The soft, lower part of the ear.
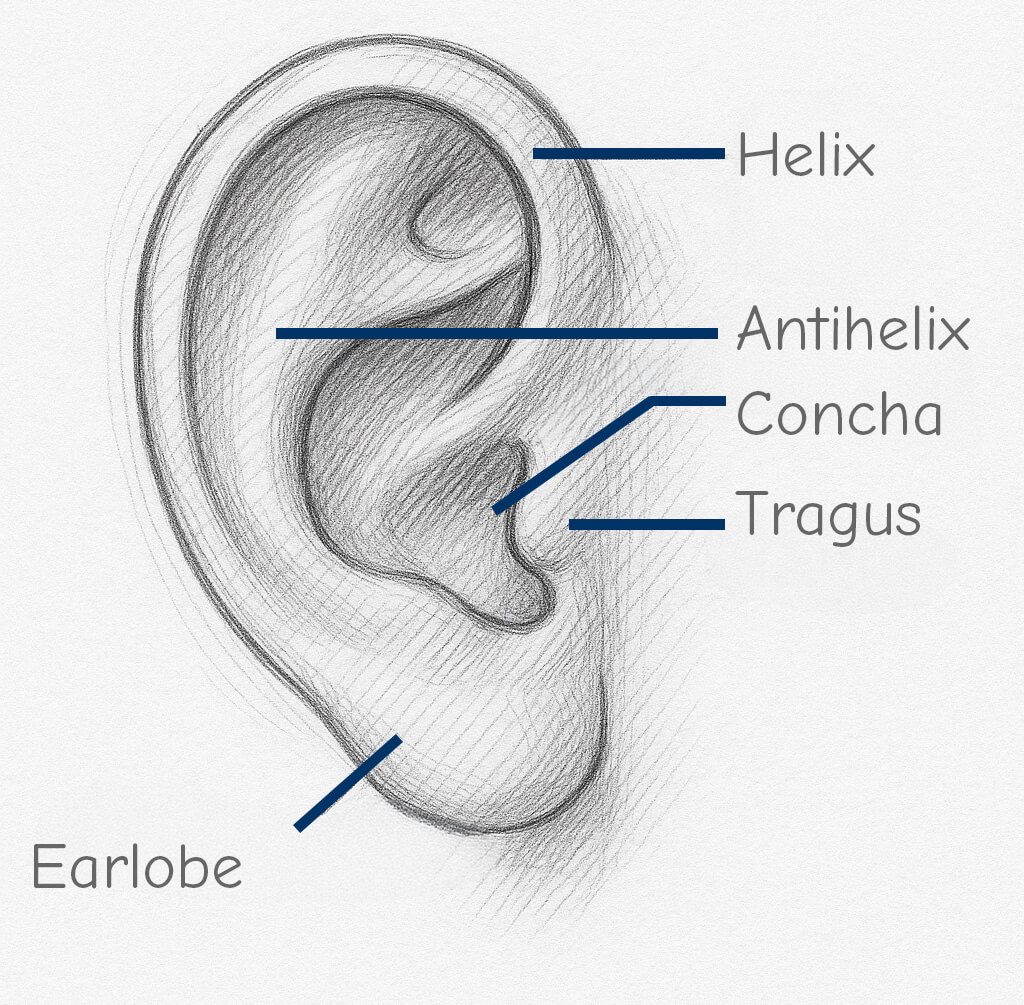
You don’t have to memorize these terms – but a basic understanding will help you to classify and shade shapes correctly.
Drawing ears – sketching step by step
These instructions will guide you through five clear steps – from the basic structure to the final shading. Perfect for understanding how an ear is constructed and how you can make it look three-dimensional.

Step 1: Sketch the Basic Shape
Start loosely with a slightly tilted oval, about the size of half an egg. It can be a bit narrower at the top than at the bottom. Alternatively, a question mark with a gentle curve or an elongated C-shape can also work.
The initial goal is simply to define the basic shape – essentially, the outline of the ear. Begin by loosely suggesting the outer helix and roughly indicating the positions of the inner shapes – still without any details.
💡 Tip: Use an HB pencil (or harder) and keep your lines loose and easy to correct.
Step 2: Draw the Key Shapes
Now it’s time to construct the ear:
- The helix rolls down as a curved line from the top to the earlobe.
- The antihelix appears as a fork-like Y-shape on the inside.
- The concha is like a funnel-shaped hollow – centered and slightly recessed.
- The tragus is a small, front-facing cartilage bump near the face.
- The earlobe is soft and round – feel free to emphasize it a bit thicker.
💡 Tip: Imagine the ear as two rolled arcs with a hollow in the middle – this makes its 3D structure easier to grasp.
Step 3: Refine the Shapes
Now go over your lines with a bit more pressure:
- Pay attention to smooth curves, not sharp edges – the ear is made of cartilage, not stone.
- The helix should look like a rolled edge.
- The antihelix lies deeper, but is often quite prominent.
- Leave small gaps between individual parts to create depth.
💡 Tip: Use the eraser deliberately to remove distracting guidelines or to lighten areas.
Step 4: Shading for Depth
Now the drawing comes to life! Use softer pencils like 2B or 4B:
- The concha is the deepest point – it should be the darkest area.
- The helix gets a soft inner shadow edge to emphasize its curvature.
- Highlights (e.g., on the earlobe) can be created by erasing or leaving areas blank.
💡 Tip: Gently blend the shadows using a blending stump, cotton swab, or your finger – this creates natural transitions.
Step 5: Final Touches
Now it’s time for the details:
- Add subtle folds or indentations.
- Refine transitions between light and dark areas using a soft pencil.
- Apply intentional contrasts, e.g., dark lines next to light areas.
This will make your ear look three-dimensional and realistic!
Pay Attention to Perspective
An ear changes significantly depending on the angle – so try out different views:
- Side view (full view),
- Front view (the ear is only partially visible),
- Three-quarter view (interesting due to perspective foreshortening).
💡 Tip: It’s best to make small sketches – this trains your eye and improves your understanding of form and depth.
Conclusion
Drawing ears is a great exercise to improve your understanding of form, light, and spatial depth. If you take the time to observe the structure and practice regularly, your portraits will become noticeably more lively and realistic.
Have fun drawing – and be sure to look at real ears for reference! 👂✏️
Sample Tutorials to Follow Along
Below you’ll find a few step-by-step tutorials for drawing ears from different perspectives.

Ear from the Left Side
This tutorial guides you step by step on how to draw an ear in the classic left side view – ideal for portraits and profile drawings.
1. Sketch the Basic Shape
- Start with a hard pencil (HB, F, H).
- Draw the rough outline of the head and a slightly curved “C” for the ear.
- The ear is positioned on the side, roughly between the height of the eyebrow and the tip of the nose.
- Keep the lines light – no details yet!
2. Establish the Ear Structure
- Add the inner lines: loosely sketch in the helix, antihelix, and tragus.
- Position the shapes anatomically correctly – pay attention to proportions and angles.
3. Define Inner Structures
- The inner shapes of the ear are now drawn more clearly.
- Focus especially on the concha and antihelix, which are refined further.
- Begin light shading – this adds more depth.

4. Initial Shading
- Use a soft pencil (2B, 3B, 4B, etc.).
- Deeper areas, especially the concha, should be shaded significantly darker.
- Outer edges remain lighter – contrasts help enhance spatial depth.
5. Light Gradation and Transitions
- Blend pencil lines using tools (e.g., blending stump, cotton swab).
- Shading is softly blended – transitions appear more realistic.
- Highlights (e.g., on the earlobe) are emphasized by leaving areas unshaded.
6. Add Hair and Background
- Sketch in the hair – it emphasizes contrast with the ear.
- Neck and shoulder area are lightly suggested.
- Final details make the drawing complete and three-dimensional.
Pierced Male Ear
In this tutorial, you’ll learn how to draw a realistic male ear with multiple piercings – perfect for modern portraits or character designs with a distinctive style.
1. Define the Basic Shape and Head Outline
- Start with a hard pencil (HB, F, H).
- Light sketch of the side outline of the head.
- A simple curve for the ear, roughly at eye level.
- Just a rough guide – no details yet.
2. Refine the Ear Shape
- Draw the exact shape of the ear with inner structures (helix, antihelix, earlobe).
- First indication of proportions and smooth curves.
3. Develop the Inner Structure
- All internal parts of the ear are more clearly defined.
- The concha (ear bowl), tragus, and antihelix are now visible.
- Light shading begins – depth is suggested.

4. Add Piercings
- Use a soft pencil (2B, 3B, 4B, etc.).
- Draw multiple piercings:
- Two rings at the top (helix)
- A stud on the tragus
- A tunnel or plug in the earlobe
- Emphasize details with small shadows.
5. Enhance the Shading
- Deepen the shading inside the ear.
- Darken recessed areas (e.g., the concha) more strongly.
- Consider the light source – this adds three-dimensionality.
6. Hair and Contrast
- Blend pencil lines using tools (e.g., blending stump, cotton swab).
- Add hair around the ear (suggested short hairstyle).
- Increase contrast between the ear and the facial skin.
- Reinforce final contours – the ear now looks complete and realistic.
From Behind on the Right
This guide shows you how to draw an ear from a rear, angled-right perspective – a subtle but important viewpoint for realistic back views of figures or dynamic angles.
1. Head Outline and Outer Ear Shape
- Start with a hard pencil (HB, F, H).
- Draw the side outline of the head from behind and to the right.
- Add a simple curved shape for the ear – just the outer contour.
- Important: The ear shape appears foreshortened due to the angled perspective.
2. Indicate the Inner Ear Structure
- Begin with the helix and antihelix, which curve clearly inward.
- Sketch in the tragus area and earlobe – gently and anatomically correct.
- No details or shading yet.
3. Define the Shapes
- The ear structure becomes more distinct: lines with more pressure, transitions become clearer.
- Visible separation of planes and spaces within the ear.

4. Add Initial Shadows
- Use a soft pencil (2B, 3B, 4B, etc.).
- Start shading the deepest areas like the concha.
- The area behind the ear is gently darkened.
- Initial contrasts help emphasize the form.
5. Depth and Dimensionality
- Blend pencil lines using tools (e.g., blending stump, cotton swab).
- Intensify shading, especially between the helix and the background of the ear.
- The neck area is also softly shaded to define the shape of the head.
6. Add Hair
- The ear is now integrated into its surroundings: long hair is added over and behind the ear.
- Hair strands loosely frame the ear without covering it.
- The overall drawing now appears realistic and harmonious.
From Behind While Lying Down
This special tutorial helps you capture a human ear from behind in a lying position – perfect for practicing unusual perspectives and lighting conditions.
1. Outline the Head and Ear Edge
- Start with a hard pencil (HB, F, H).
- Draw the upper part of the head in a lying position (slightly curved).
- Add a long, curved arc for the outer ear base – from this perspective, it appears almost flat.
2. Ear Shape in Detail
- Add the inner curve of the ear – define the visible edge of the helix.
- The ear appears slightly compressed due to lying down.
3. Initial Shading
- Start with light shading beneath the helix.
- Make sure the upper edge stays lighter – that’s where the light hits.

4. Enhance Contrast
- Use a soft pencil (2B, 3B, 4B, etc.).
- Darken the underside of the ear edge significantly – cast shadows emphasize the curve.
- Leave the light edge clear – this creates realistic lighting.
5. Lightly Indicate the Surroundings
- Blend pencil lines using tools (e.g., blending stump, cotton swab).
- Add soft shading to the back of the head.
- This provides context – the ear feels embedded into the head.
6. Hair Details and Final Touches
- Draw strands of hair flowing over the ear.
- Add depth and naturalism by casting shadows from the hair onto the ear.
- The overall image now appears realistic and complete.
Drawing the Right Ear from the Side
This tutorial shows you how to correctly construct a right ear in profile view – an important exercise for symmetrical portrait drawing.
1. Basic Head and Ear Shape
- Start with a hard pencil (HB, F, H).
- Sketch the outline of the head in side view (right profile).
- Draw a simple, vertical “C” shape for the ear – slightly tilted.
- The ear sits centered on the side of the head, at eye level.
2. Outline the Inner Ear Shape
- Roughly add the helix (outer rim) and first lines of the antihelix.
- Mark the position of the tragus and a suggestion of the earlobe.
- Keep lines soft and easy to adjust.
3. Begin Detailing
- Now draw more clearly and with more pressure: define all ear components like helix, antihelix, tragus, and concha.
- Initial shading suggests depth within the inner ear.

4. Refine the Shading
- Use a soft pencil (2B, 3B, 4B, etc.).
- Deepen the dark areas (especially the concha and antihelix).
- Leave light areas unshaded – this creates natural contrast.
- Blend transitions smoothly.
5. Integrate the Surroundings
- Blend pencil lines using tools (e.g., blending stump, cotton swab).
- Add soft shading to the neck area – this enhances the 3D effect.
- The ear’s base appears more dimensional through tonal gradation.
6. Hair and Final Contrasts
- Sketch the hairstyle around the ear (short hair using line texture).
- Enhance contrasts between the ear, hair, and facial contour.
- The drawing now has depth and is realistically complete.
More Pages
From the German Blog
- Drawing and Painting Colored Pencil Portraits
- Painting Portraits with Colored Pencils
- Drawing an Afro Woman Portrait with Colored Pencils
- Drawing a Girl with a Soda Bottle Using Colored Pencils
- Drawing a Girl Resting Her Head on Her Hand with Colored Pencils
- Blending and Shading with Pencil
- Drawing Technique: Learning to Draw with a Grid